Using CIMTool Documentation Features
CIMTool 2.3.0 introduces a set of features for authoring rich, professional documentation directly from CIM profiles.
These features address a need that profile authors have long had: producing human-readable specifications that stay in step with the profile itself. Rather than maintaining documentation separately and by hand, you can write custom content within CIMTool and author expanded documentation at the level of individual profile elements. CIMTool builders aid in generating modularized documentation components that, in turn, can then be included in master documents.
All of this is built on AsciiDoc, a concise, plain-text authoring format designed for technical documentation. AsciiDoc content is easy to write, friendly to version control, and can be published to multiple output formats. The documentation CIMTool generates from a profile is AsciiDoc, the content you author within CIMTool is AsciiDoc, and the bundled editor renders AsciiDoc previews, so establishing a working familiarity with the AsciiDoc format is helpful. This page closes with an AsciiDoc Syntax Quick Reference to get you started.
What follows is a walk through where documentation lives in a project, how to author it at the various levels in a profile, what types of AsciiDoc builders currently ship with CIMTool and the type of documentation they produce, and finally, using the new publicly available CGMES-CIM17 sample project as a working example, how to assemble a complete master document.
The Five Project Folders
Every CIMTool project is created with the same set of top-level folders, generated automatically when the project is created. With the introduction of the Documentation folder in CIMTool 2.3.0, there are now five formally recognized folders. Understanding what each folders purpose is makes it clear where the Documentation folder fits into the workflow.
Click on the image to present a larger view.
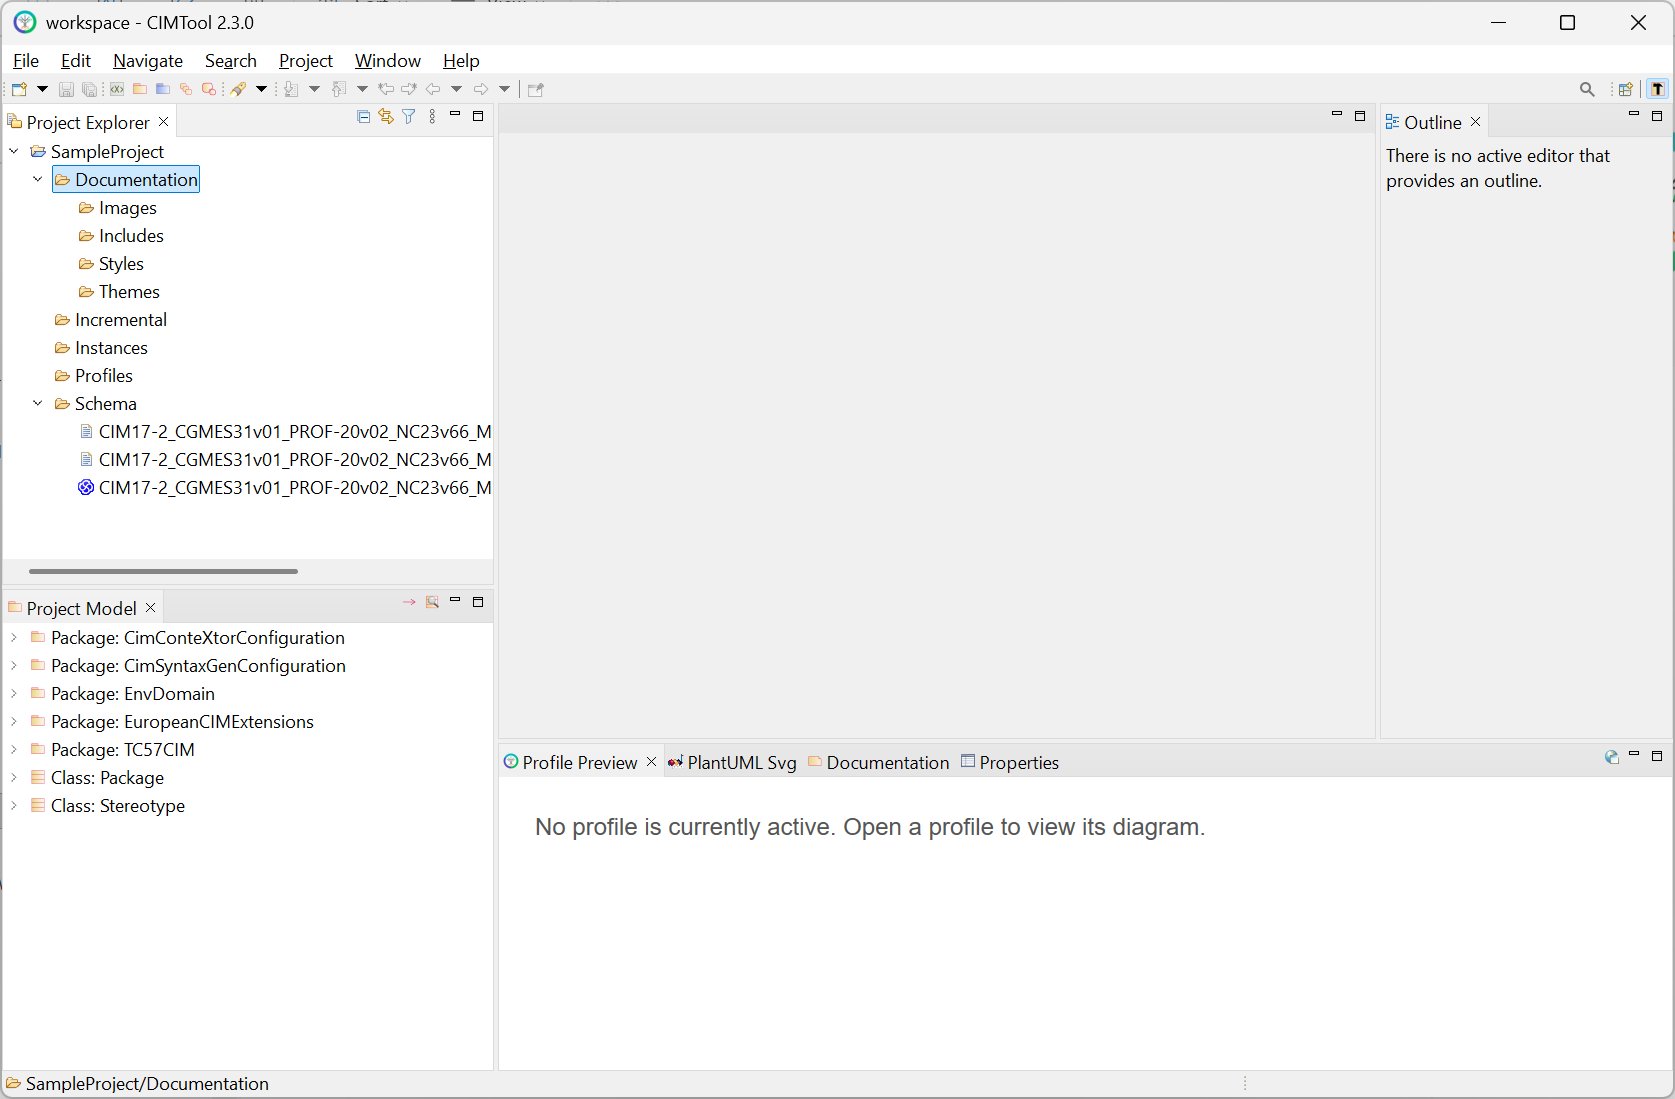
The five folders, shown in the Project Explorer above are:
| Folder | Purpose |
|---|---|
| Documentation | For AsciiDoc-related documentation artifacts and introduced in CIMTool 2.3.0 |
| Incremental | For CIM XML incremental files in RDF format, with a .xml extension. Used when validating CIM/XML instance models in CIMTool. |
| Instances | For CIM XML instance files in RDF format, with a .xml extension. Used when validating CIM/XML differences models in CIMTool. |
| Profiles | For profile definitions and their generated artifacts. A profile definition itself is stored as an OWL file (.owl); the XSD, JSON Schema, RDFS, and other artifacts found in this folder are those generated from the .owl definition by CIMTool's builders. Log files identifying errors are written as .log text files, and depending on how CIMTool is used, HTML, RTF, XML, Java, and SQL files, among other types, may also be hosted here. |
| Schema | Contains the schema that profiles are built from. Two formats can be used: a CIM model in XMI format (.xmi), generated from the UML model in Sparx EA; or Enterprise Architect project files used directly by CIMTool, both 32-bit EA15 (.eap, .eapx) and 64-bit EA16/EA17 (.qea, .qeax). |
The Documentation and Profiles folders are the two that matter for the purposes of documentation generation: the documentation builders write their generated AsciiDoc output into Profiles alongside the OWL profile definitions, while the Documentation folder is where you assemble generated content together with end-user written content into a finished document. The remaining sections look at each of these in turn.
Inside the Documentation Folder
The Documentation folder is created with four subfolders, each intended for a specific kind of AsciiDoc-related content. As with the project folders themselves, these subfolders are generated automatically, so you do not need to create them by hand. Within the CGMES-CIM17 sample project, each subfolder also contains a small readme.txt placeholder describing what belongs within the folder.
| Subfolder | Purpose |
|---|---|
| Images | Image assets referenced from your documents (diagrams, screenshots, logos, and the like). |
| Includes | Modular AsciiDoc content files (.adoc) intended to be pulled into a master document. |
| Styles | Custom CSS stylesheets (.css) that control the appearance of HTML output. |
| Themes | Custom theme files (.yml) that control the appearance of PDF output. |
The master document itself, the top-level .adoc file that aggregates modularized documentation components together, lives at the root of the Documentation folder, alongside these four subfolders. Building a master document is covered in detail in Building a Master Document.
Tip
For larger documentation efforts, it is common to organize the Includes folder further by creating subfolders beneath it, grouping related modular content into logical units. CIMTool places no restrictions on this, and the structure beneath Includes is yours to arrange in a manner that best meets your documentation needs.
The CGMES-CIM17 sample project shows this layout in practice. Its Documentation folder holds a master document, CGMES-Documentation.adoc, at the root; a set of modular narrative files under Includes (an introduction, a CGMES overview, profile-group introductions, a conclusion, and more); a custom HTML stylesheet under Styles; and a custom PDF theme under Themes.
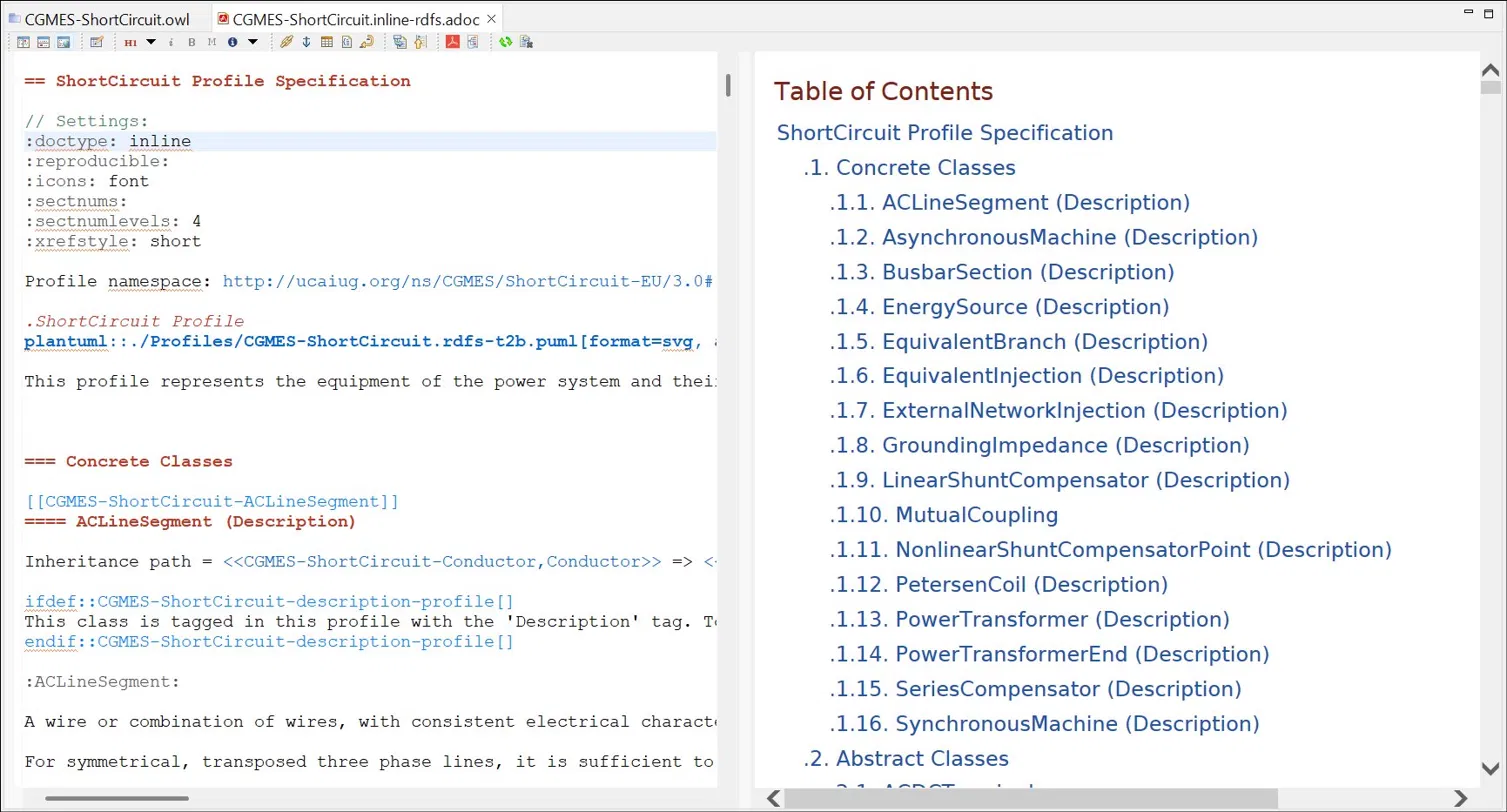
The Asciidoctor Eclipse Editor
Authoring and previewing AsciiDoc content within CIMTool is handled by the Asciidoctor Eclipse editor, which is bundled with CIMTool 2.3.0 out of the box. No separate installation is required. When you open an .adoc file in the workbench, the editor is automatically launched for the selected file.
The editor provides a live, side-by-side preview: your AsciiDoc source on one side and the rendered result on the other. The preview reflects the same AsciiDoc processing CIMTool uses elsewhere, so what you see in the editor is a faithful representation of the final output.
Click on the image to present a larger view.
Note
The Asciidoctor editor renders previews by running an external Asciidoctor process and communicating with it, rather than by embedding the AsciiDoc processor inside CIMTool itself. This is an implementation detail you do not normally need to think about, but it explains the editor's "rebuild" and "clear cache" toolbar actions described below, which manage that external rendering process.
The Editor Toolbar
The editor's toolbar provides quick access to formatting, insertion, navigation, and output actions.
Click on the image to present a larger view.

The buttons, from left to right, are:
| Button | Action |
|---|---|
| Vertical layout | Arranges source and preview side by side (vertical split). |
| Horizontal layout | Arranges source and preview one above the other (horizontal split). |
| Preview in external browser | Renders the document to HTML and opens it in your default external browser. |
| Open rendering preferences | Opens the editor's rendering preferences, where custom AsciiDoc attributes used during rendering can be defined. |
Section level (H1) |
Inserts a section heading. The dropdown selects the level, from Document Title (H0) through Level 5 Section (H5). |
| Italic | Formats the selected text as italic. |
| Bold | Formats the selected text as bold. |
| Monospace | Formats the selected text as monospace. |
| Admonition (NOTE) | Inserts an admonition. The dropdown selects the type: TIP, NOTE, IMPORTANT, WARNING, or CAUTION. |
| Insert a link | Inserts a link. |
| Insert a reference anchor | Inserts an anchor that can be referenced elsewhere via a cross reference. |
| Insert a table | Inserts a table skeleton. |
| Insert a code block | Inserts a source/listing code block. |
| Add linebreak | Inserts a hard line break. |
| Toggle table of contents | Shows or hides the table of contents in the preview. The tooltip reads "TOC is hidden" when off and "TOC is shown" when on. |
| Jump to top of AsciiDoc view | Scrolls the preview back to the top of the document. |
| Create temporary PDF | Renders the document to a temporary PDF file and opens it. |
| Create overview diagram | Generates a structural overview diagram of the current document. |
| Rebuild AsciiDoc preview content | Rebuilds the preview (also available via F5). Useful when included files or other resources have changed outside the editor, or when refreshing an external-browser preview. |
| Clear complete cache | Clears all temporary files cached for the project. The next rebuild takes longer because everything is regenerated. |
Rendering Preferences
The Open rendering preferences toolbar button opens a preferences dialog for defining custom AsciiDoc attributes that are applied when the editor renders a document.
Click on the image to present a larger view.

Warning
Custom attribute entries defined here override attribute definitions of the same name declared in your documents. If a rendered document does not reflect an attribute set in its own header, check whether an entry here is overriding it.
Configuration Files
When you first open an .adoc file, the editor automatically generates an .asciidoctorconfig.adoc configuration file. This file establishes the rendering context for documents in its directory and is created and maintained by the editor, so you should leave it in place.
Adding Documentation to Profile Elements
Beyond authoring standalone narrative content, CIMTool lets you attach documentation directly to individual elements of a profile: a class, an enumeration, an attribute, an association role end, and so on. This element-level documentation is carried with the profile and is emitted by the documentation builders into the generated output for that element, so it travels with the profile rather than living in a separate document.
Two tabs in the profile editor contribute this documentation: the "Description" tab, which has been part of CIMTool since its inception, and the "Documentation" tab, introduced in CIMTool 2.3.0. Both accept AsciiDoc, so the formatting and styling described in the AsciiDoc Syntax Quick Reference applies to the text you enter in either one.
The "Description" Tab
The "Description" tab presents two fields for a selected element:
- Schema Description: the normative description carried in the source CIM schema (the UML model in the
.qea,.eap,.xmi, etc. file). This text is read-only by design: it reflects the definition as it exists in the model and cannot be edited in CIMTool. - Profile Description: a field for additional notes you supply. AsciiDoc syntax is honored here, so you can format and style the text.
Click on the image to present a larger view.
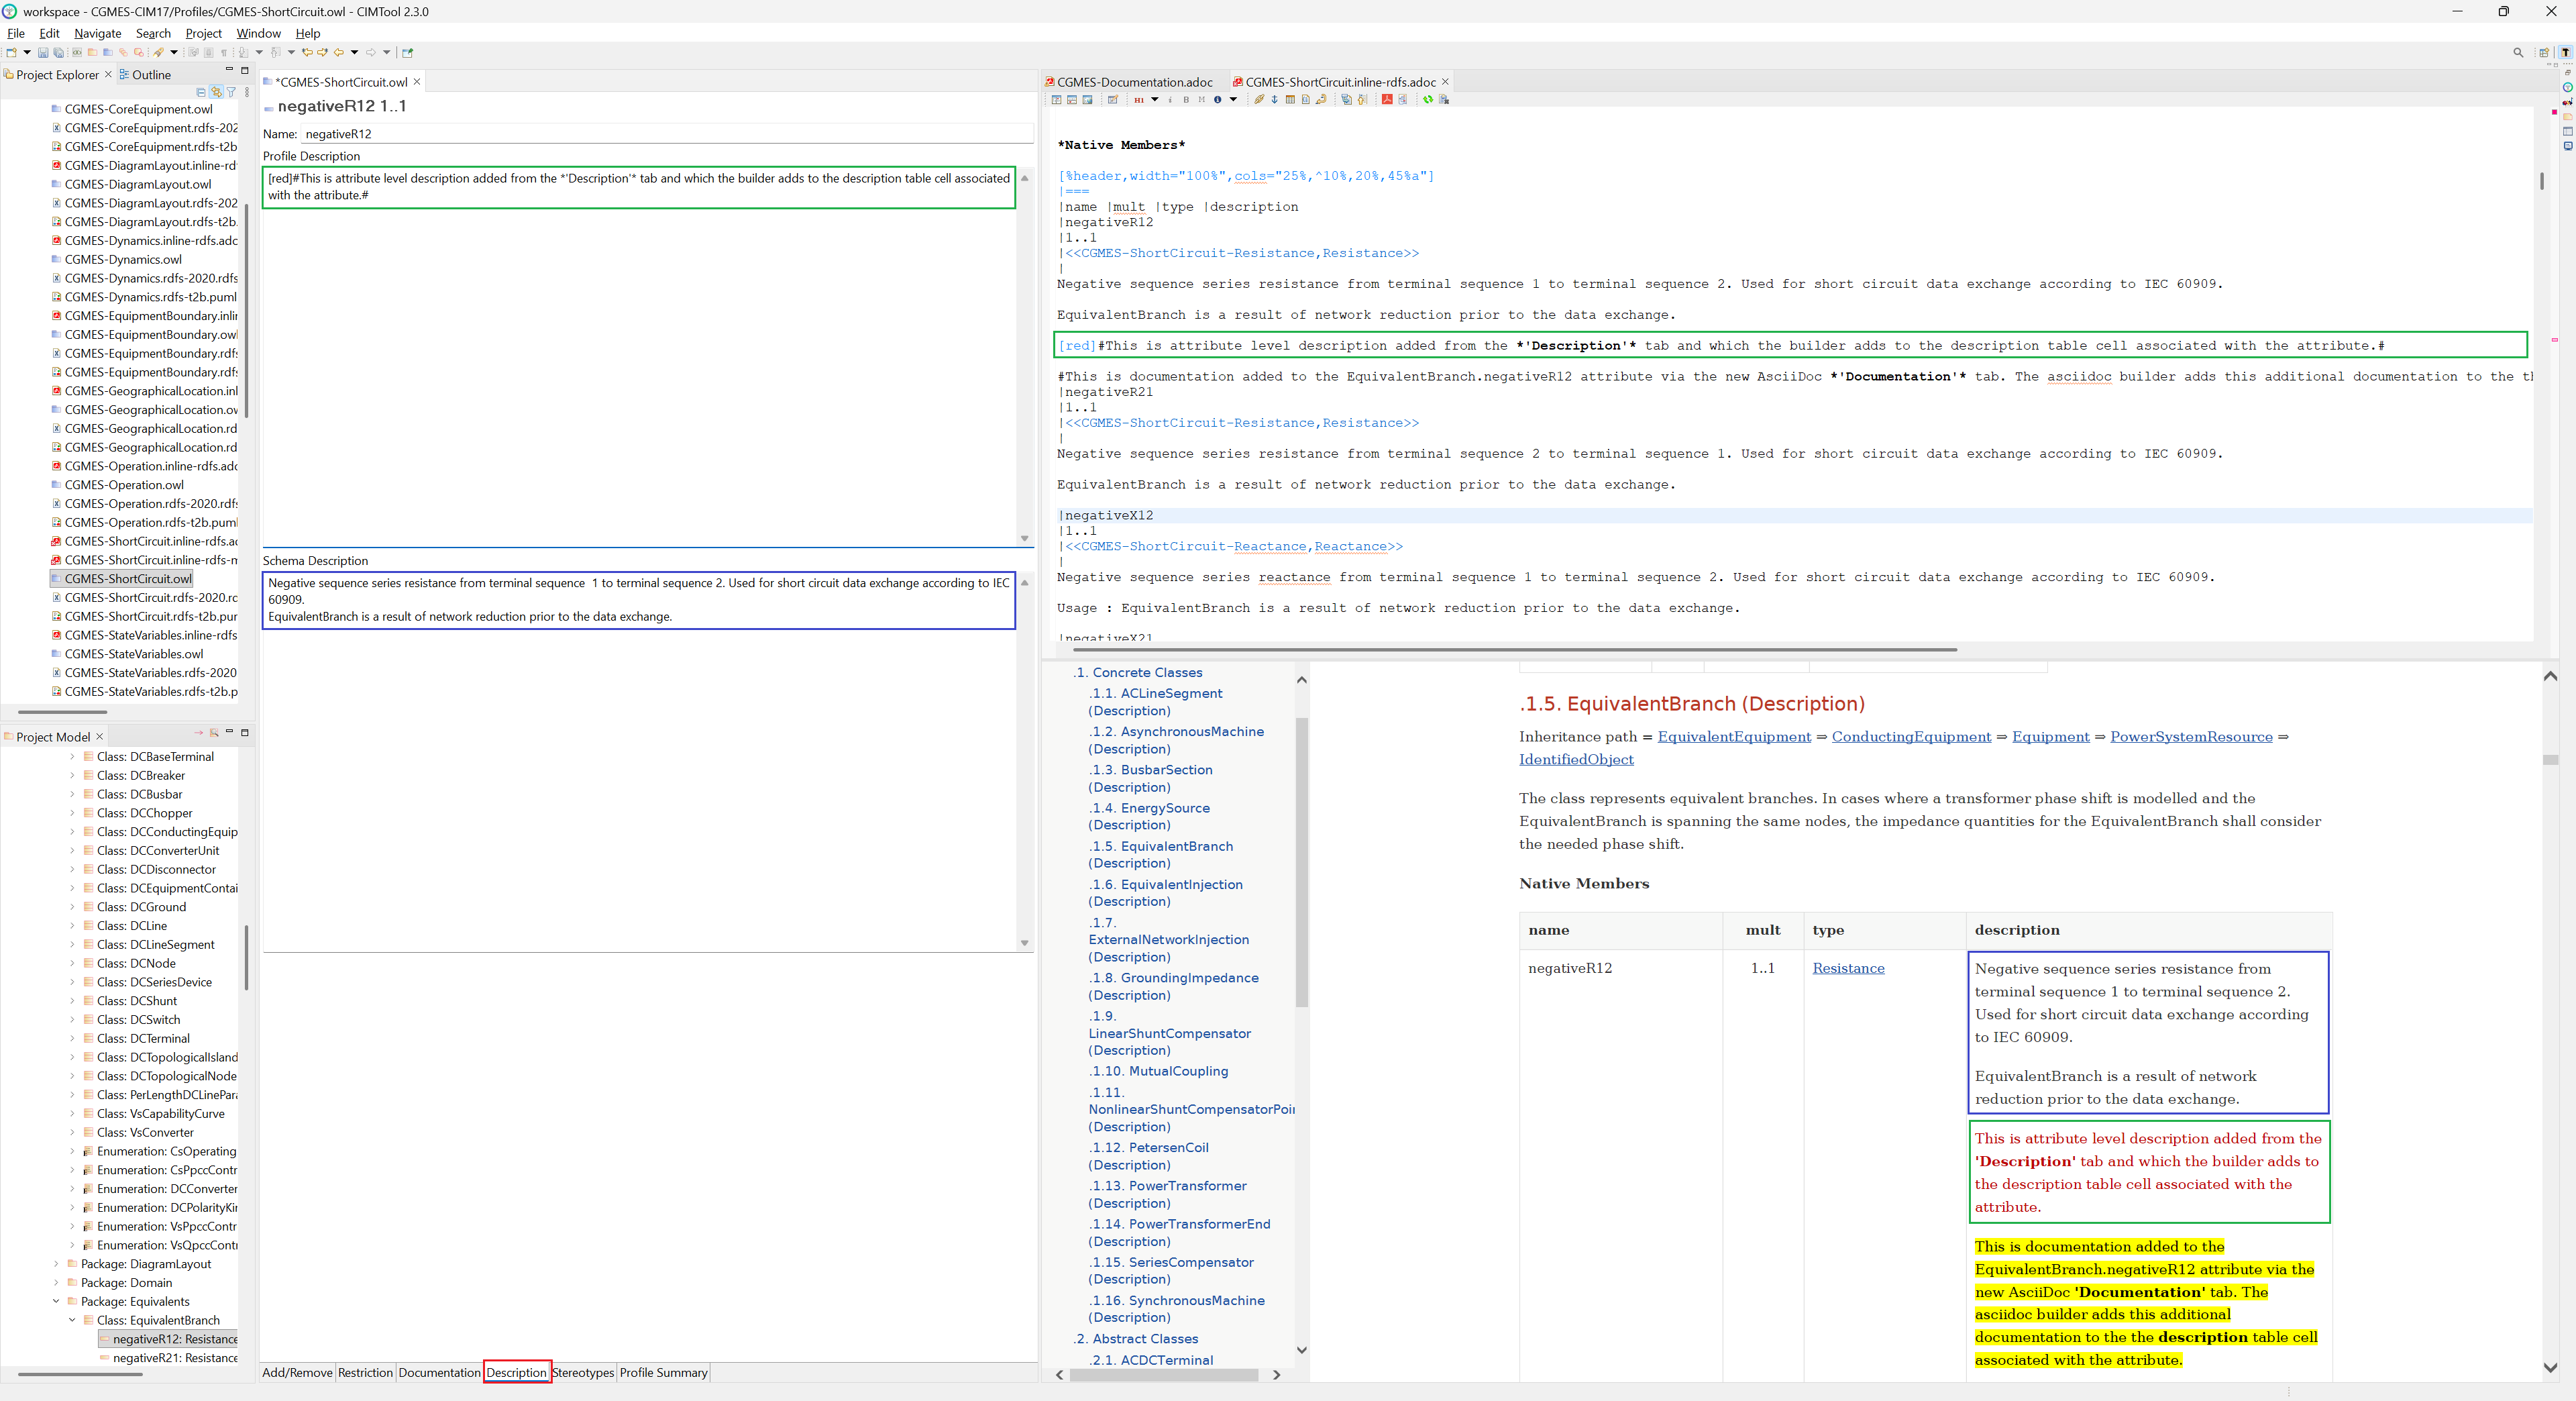
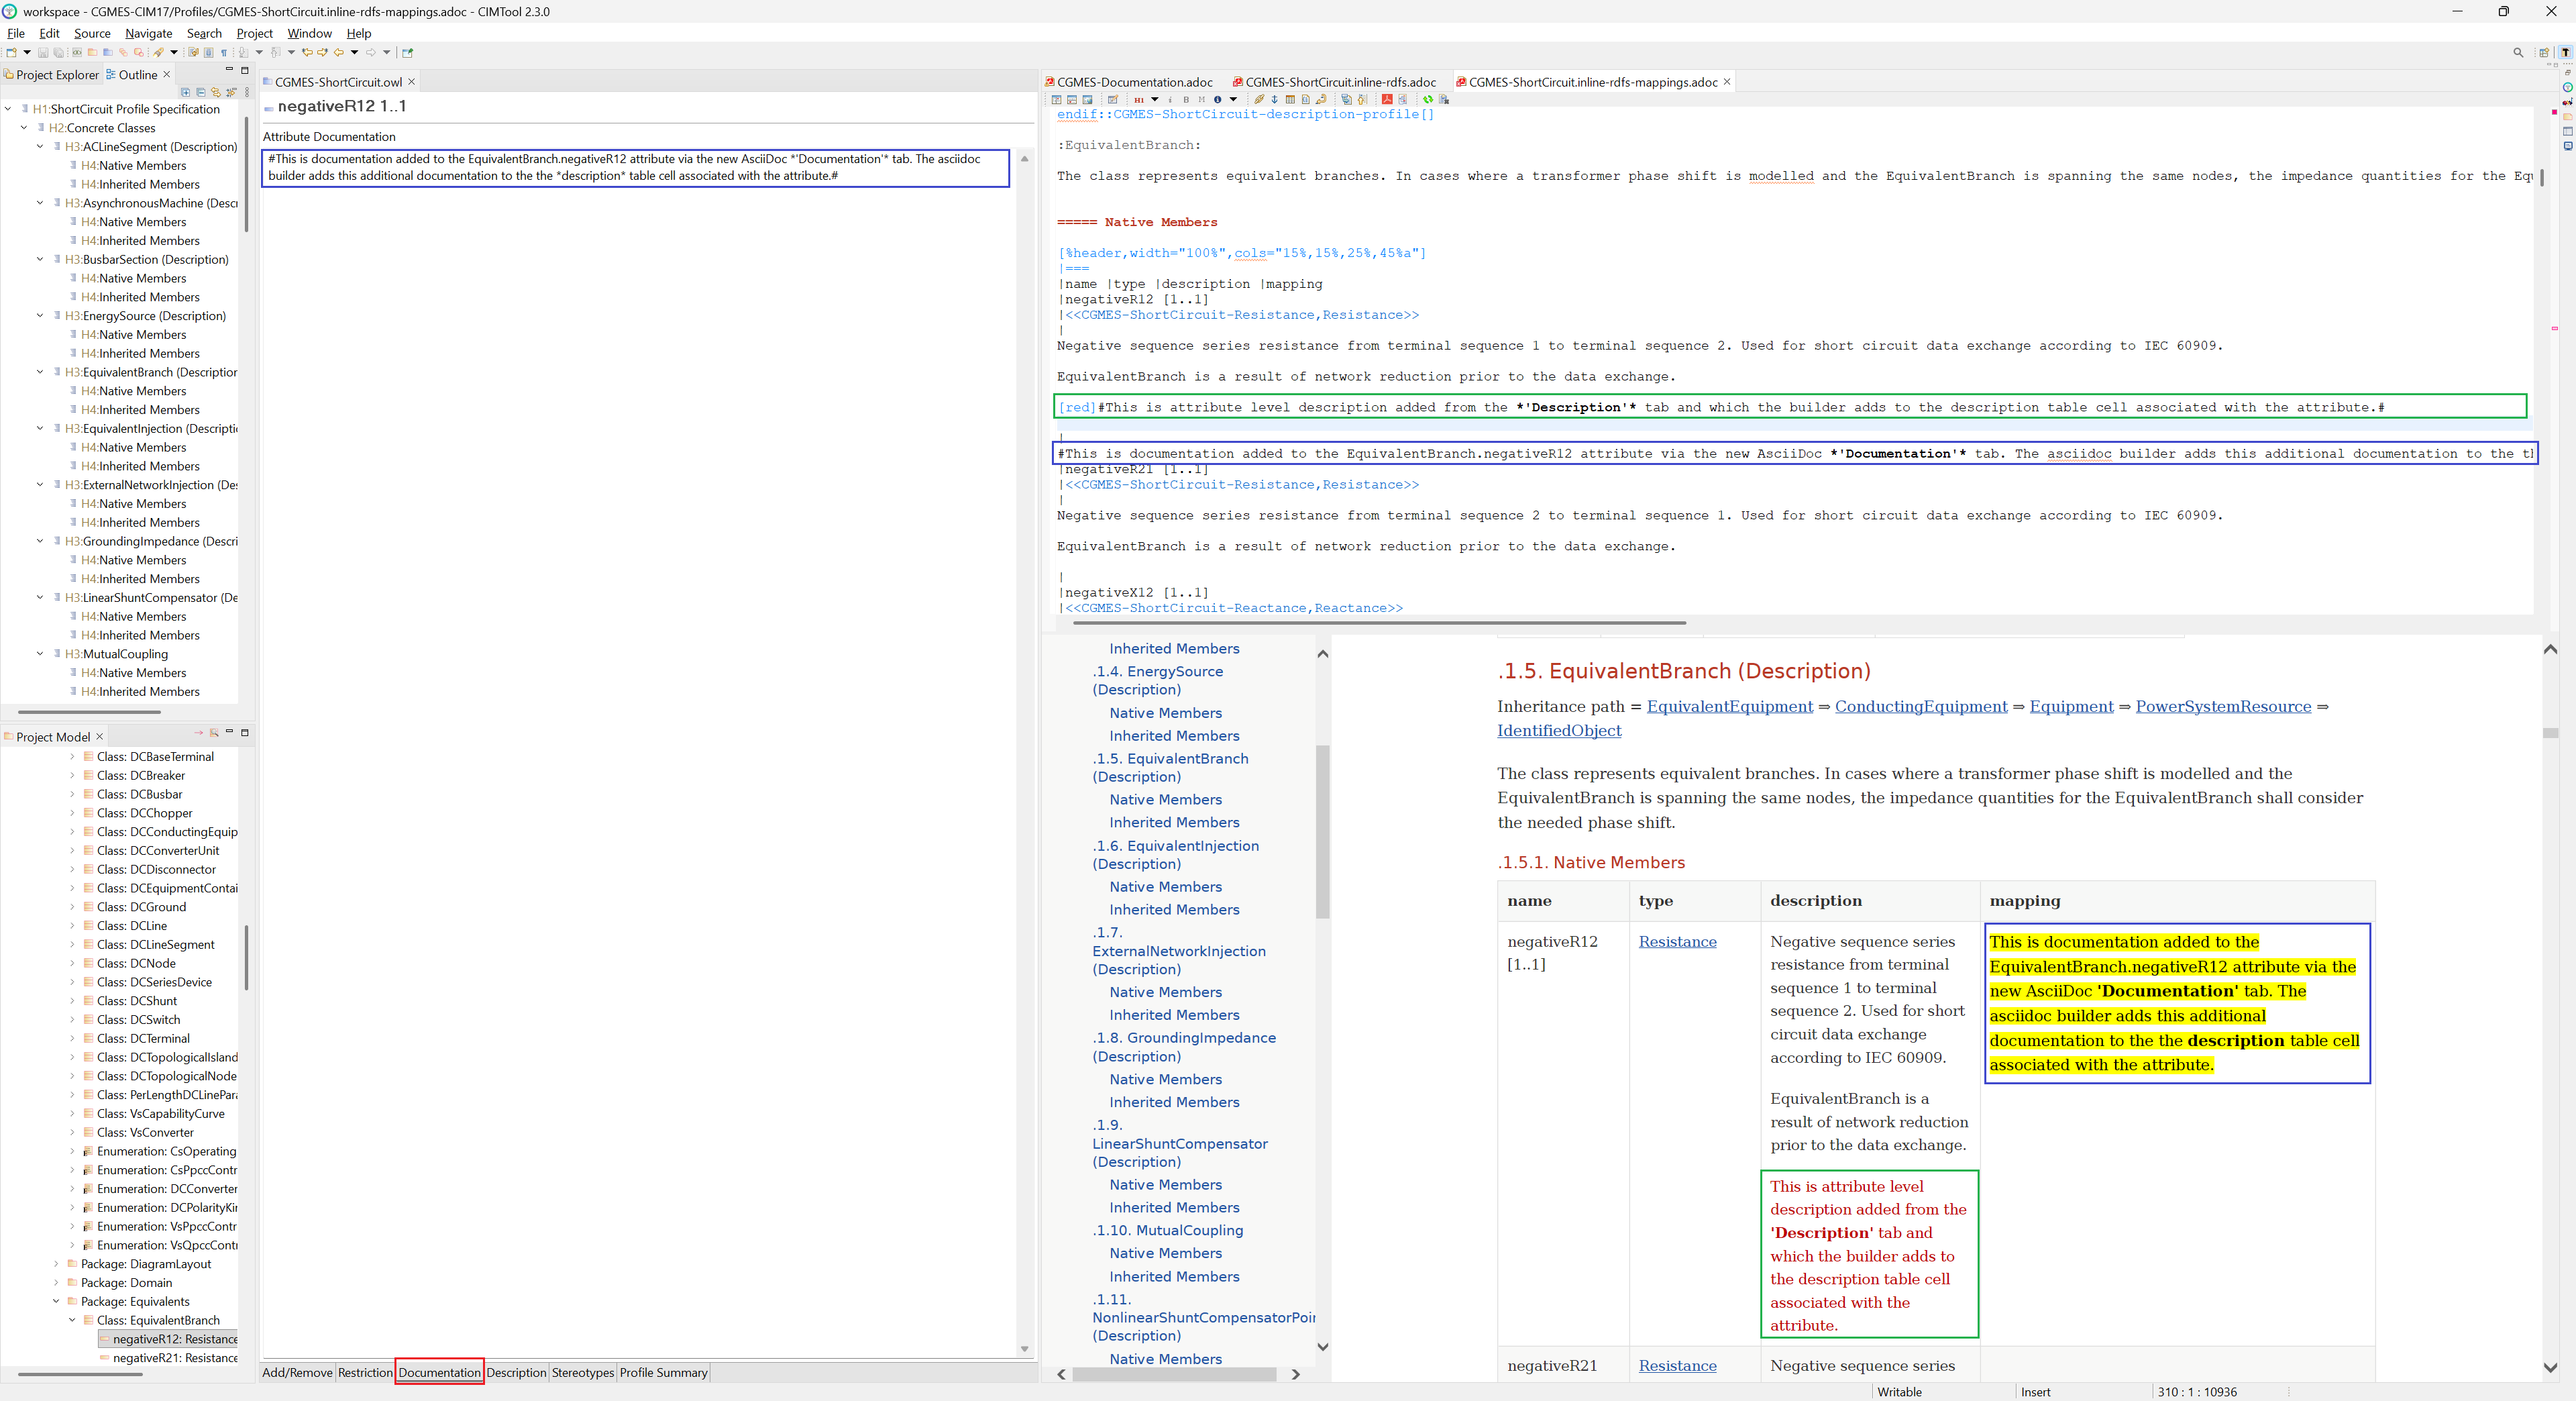
The "Documentation" Tab
The "Documentation" tab, new in CIMTool 2.3.0, provides a dedicated, full-page area for authoring element documentation in AsciiDoc.
The "Documentation" tab was introduced to give authors a substantially larger editing and viewing area than the "Description" tab's field affords. A planned future enhancement will embed richer AsciiDoc editing and live preview directly within the "Documentation" tab itself, a further reason to favor it for anything beyond a brief note.
Where Your Content Appears
The normative Schema Description is non-editable, but you can always supplement or clarify it using the two editable fields above, the "Description" tab's Profile Description and the "Documentation" tab. You may use either, or both; they are complementary. The one thing to be aware of is where each one lands in the generated output, which depends on the kind of documentation builder you use:
- The Schema Description and the Profile Description always appear together in the element's description, with the normative Schema Description first.
- The "Documentation" tab content appears in the description as well for the standard builders, but for a mappings builder it is placed instead in a separate mapping column, making the "Documentation" tab the natural place to record how an element maps to another information model or third-party system. The builders and the mapping column are covered in The AsciiDoc Builders.
Documentation in the Generated Output
The following example shows attribute-level documentation flowing through to the generated output. Documentation authored on the "Documentation" tab for the negativeR12 attribute appears in the generated AsciiDoc source and is rendered, in the preview, into the description cell for that attribute, demonstrating the full path from authored text to final output.
Click on the image to present a larger view.
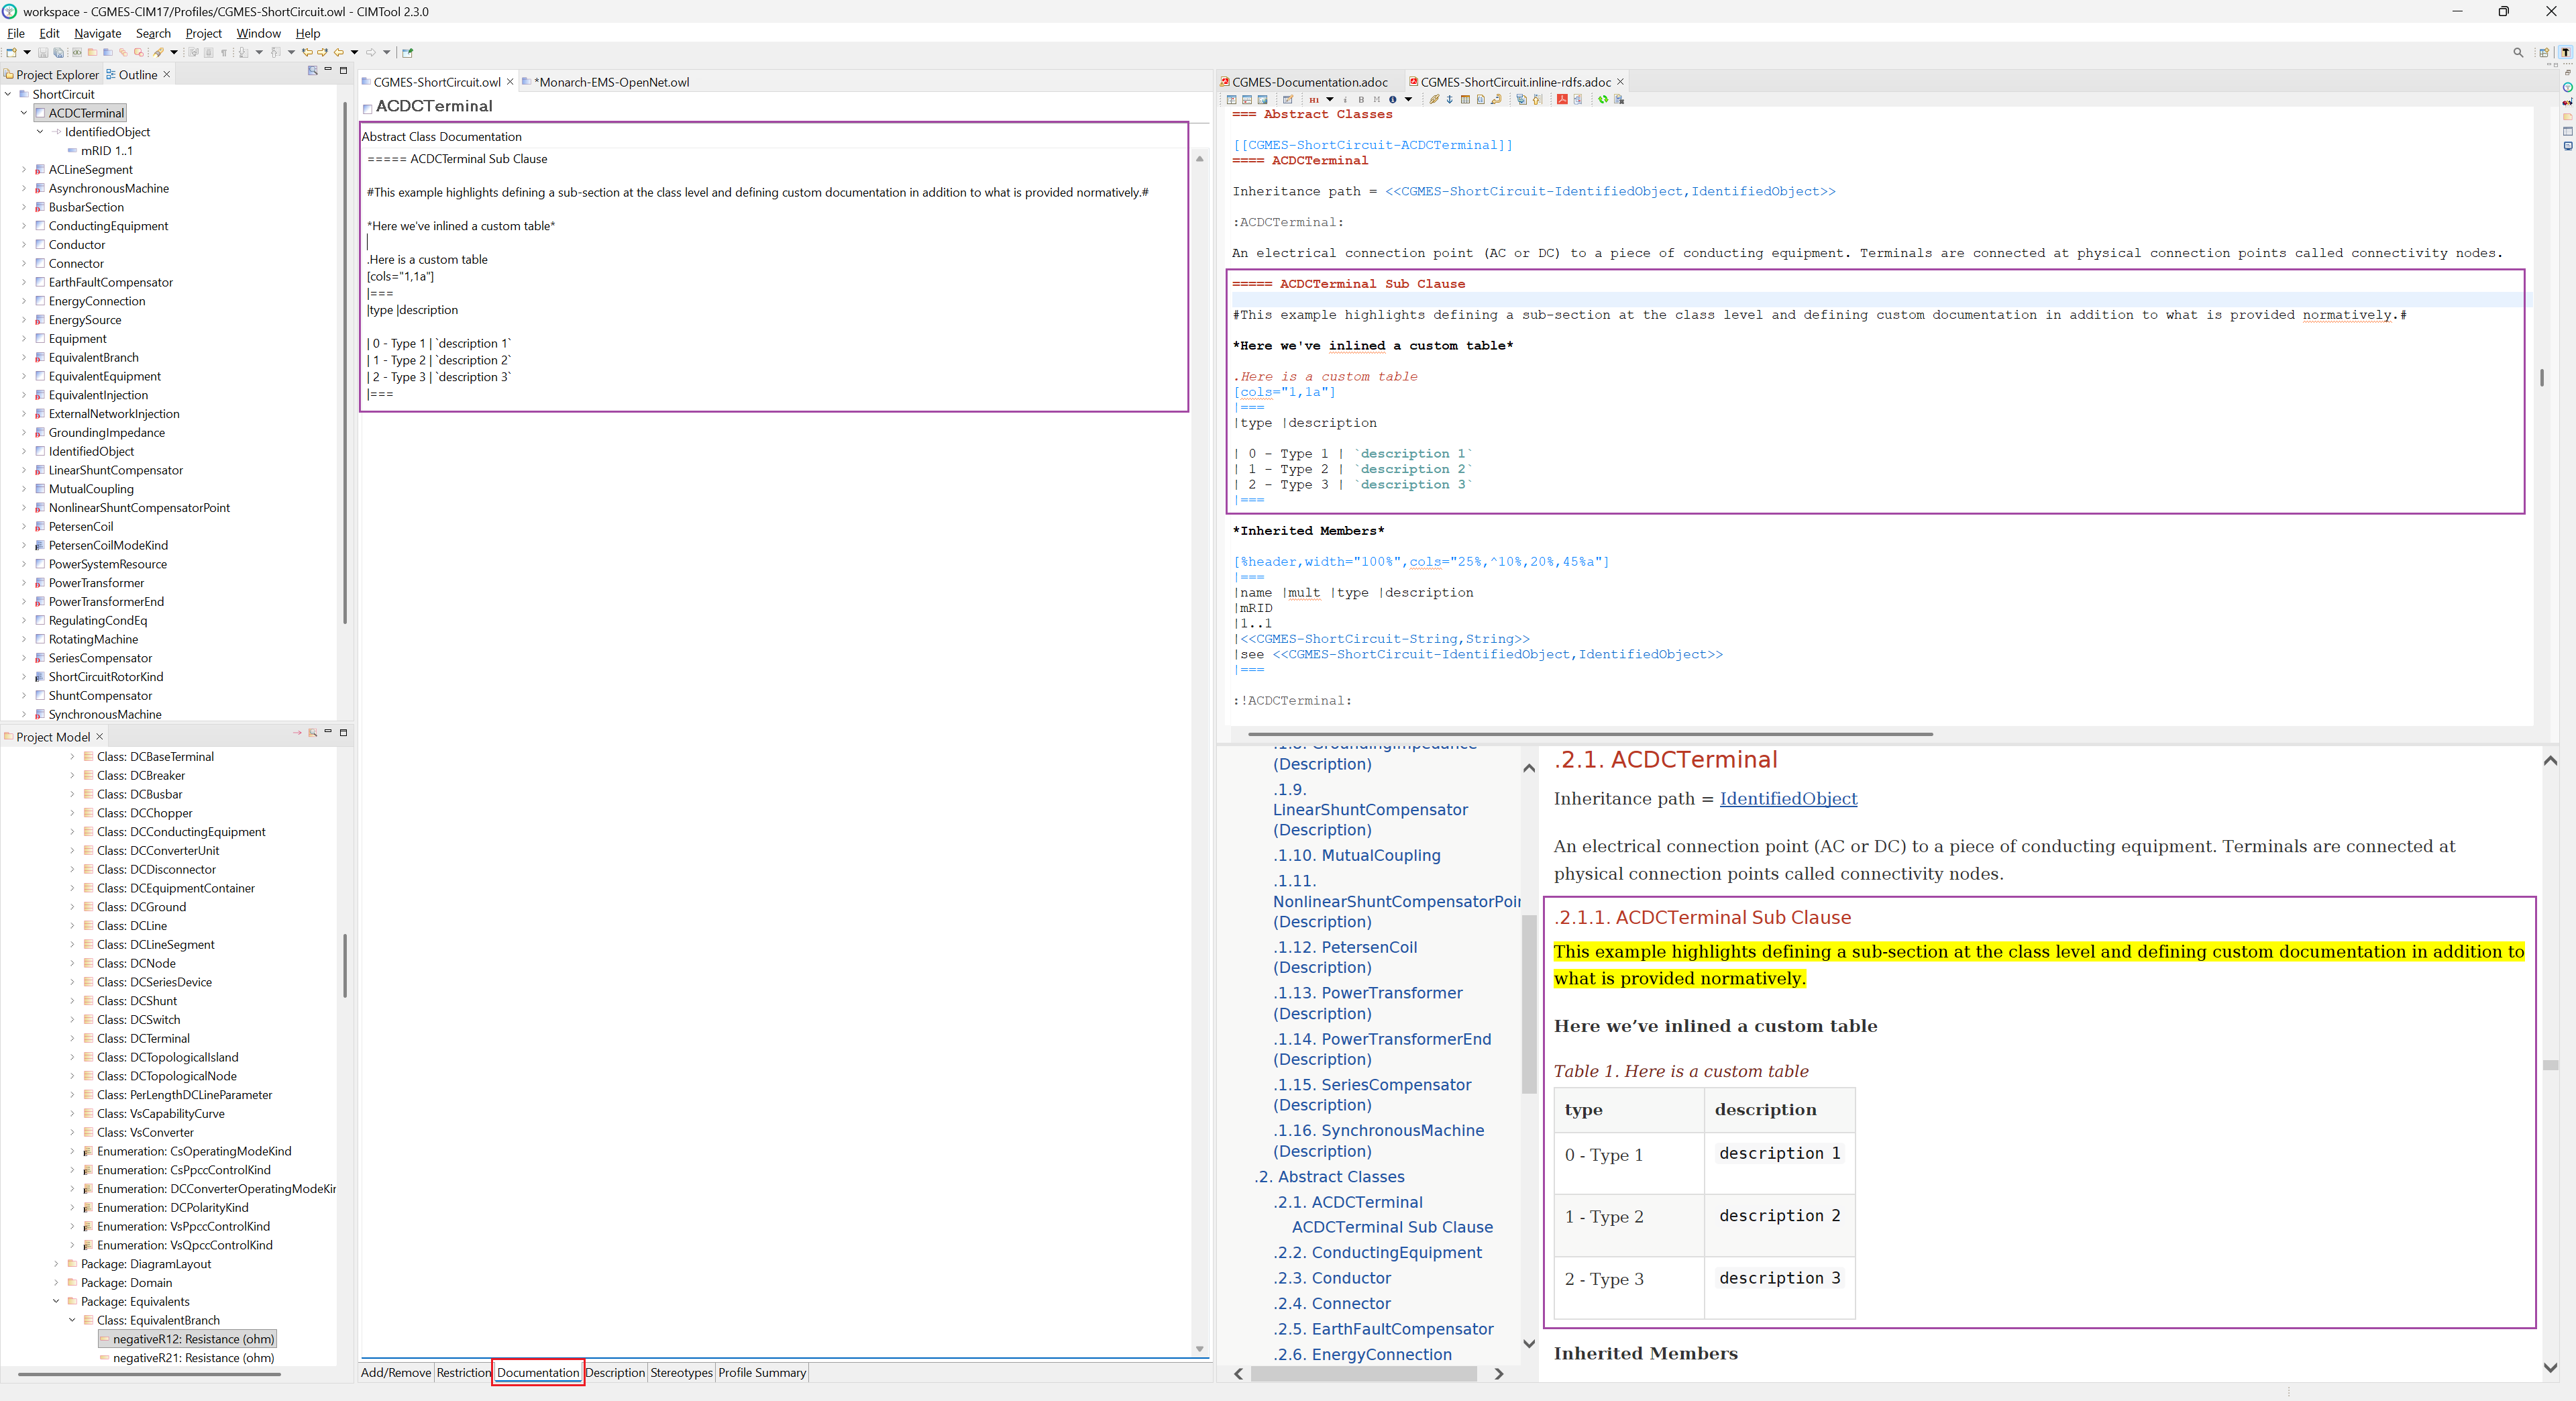
Because both tabs accept arbitrary AsciiDoc, element documentation is not limited to plain prose. You can introduce your own headings, tables, lists, and other structures, and the documentation builders fold them into the generated document. The example below adds class-level documentation to the abstract class ACDCTerminal: a custom sub-section heading and an inlined AsciiDoc table authored on the "Documentation" tab. In the generated output, the sub-section appears as a numbered subsection beneath the class (and in the document's table of contents), and the table renders as a titled, formatted table.
Click on the image to present a larger view.
The AsciiDoc Builders
CIMTool's documentation builders generate AsciiDoc directly from a profile definition. Like all CIMTool builders, they are enabled per profile and write their output into the Profiles folder alongside the profile's .owl definition. For documentation, CIMTool ships eight AsciiDoc builders, organized into two families of four.
The distinction between the two families is the kind of document each produces:
- Article builders generate a complete, standalone AsciiDoc document. The output carries a full document header, uses the
articledocument type, has its own document title, and can be rendered on its own into HTML or PDF. - Inline builders generate an AsciiDoc fragment designed to be pulled into a larger document. The output uses the
inlinedocument type, has no document title of its own, and begins at a section heading so that it slots cleanly beneath the headings of the master document that includes it.
Within each family, the four builders differ by the schema convention the documentation is generated for:
| Builder | Family | Output file | Generated for |
|---|---|---|---|
adoc-article-rdfs |
Article | .article-rdfs.adoc |
RDFS |
adoc-article-rdfs-mappings |
Article | .article-rdfs-mappings.adoc |
RDFS |
adoc-article-xsd |
Article | .article-xsd.adoc |
XSD |
adoc-article-json |
Article | .article-json.adoc |
JSON Schema |
adoc-inline-rdfs |
Inline | .inline-rdfs.adoc |
RDFS |
adoc-inline-rdfs-mappings |
Inline | .inline-rdfs-mappings.adoc |
RDFS |
adoc-inline-xsd |
Inline | .inline-xsd.adoc |
XSD |
adoc-inline-json |
Inline | .inline-json.adoc |
JSON Schema |
Choosing Between Article and Inline
Use an article builder when you want a self-contained document for a single profile, a standalone specification that can be rendered and distributed on its own. Use an inline builder when the profile's documentation is one piece of a larger work, such as a master document that brings together several profiles along with hand-written narrative. Because an inline fragment has no document title and starts at a section heading, the master document controls the overall structure and the fragment falls into place beneath it.
The element-level documentation described in Adding Documentation to Profile Elements is emitted by these builders into the generated output, regardless of which family you choose.
Note
The adoc-article-rdfs-mappings and adoc-inline-rdfs-mappings builders produce the same RDFS documentation as their non-mappings counterparts, with one addition: each class member table includes a dedicated mapping column for documenting how each CIM element maps to another information model or third-party system. This column is populated from the element's "Documentation" tab, as described in Adding Documentation to Profile Elements. Mappings are currently an RDFS-only feature in CIMTool 2.3.0; the XSD and JSON Schema builders will have mappings variant in future releases.
Annotating Extension Members with Namespace Prefixes
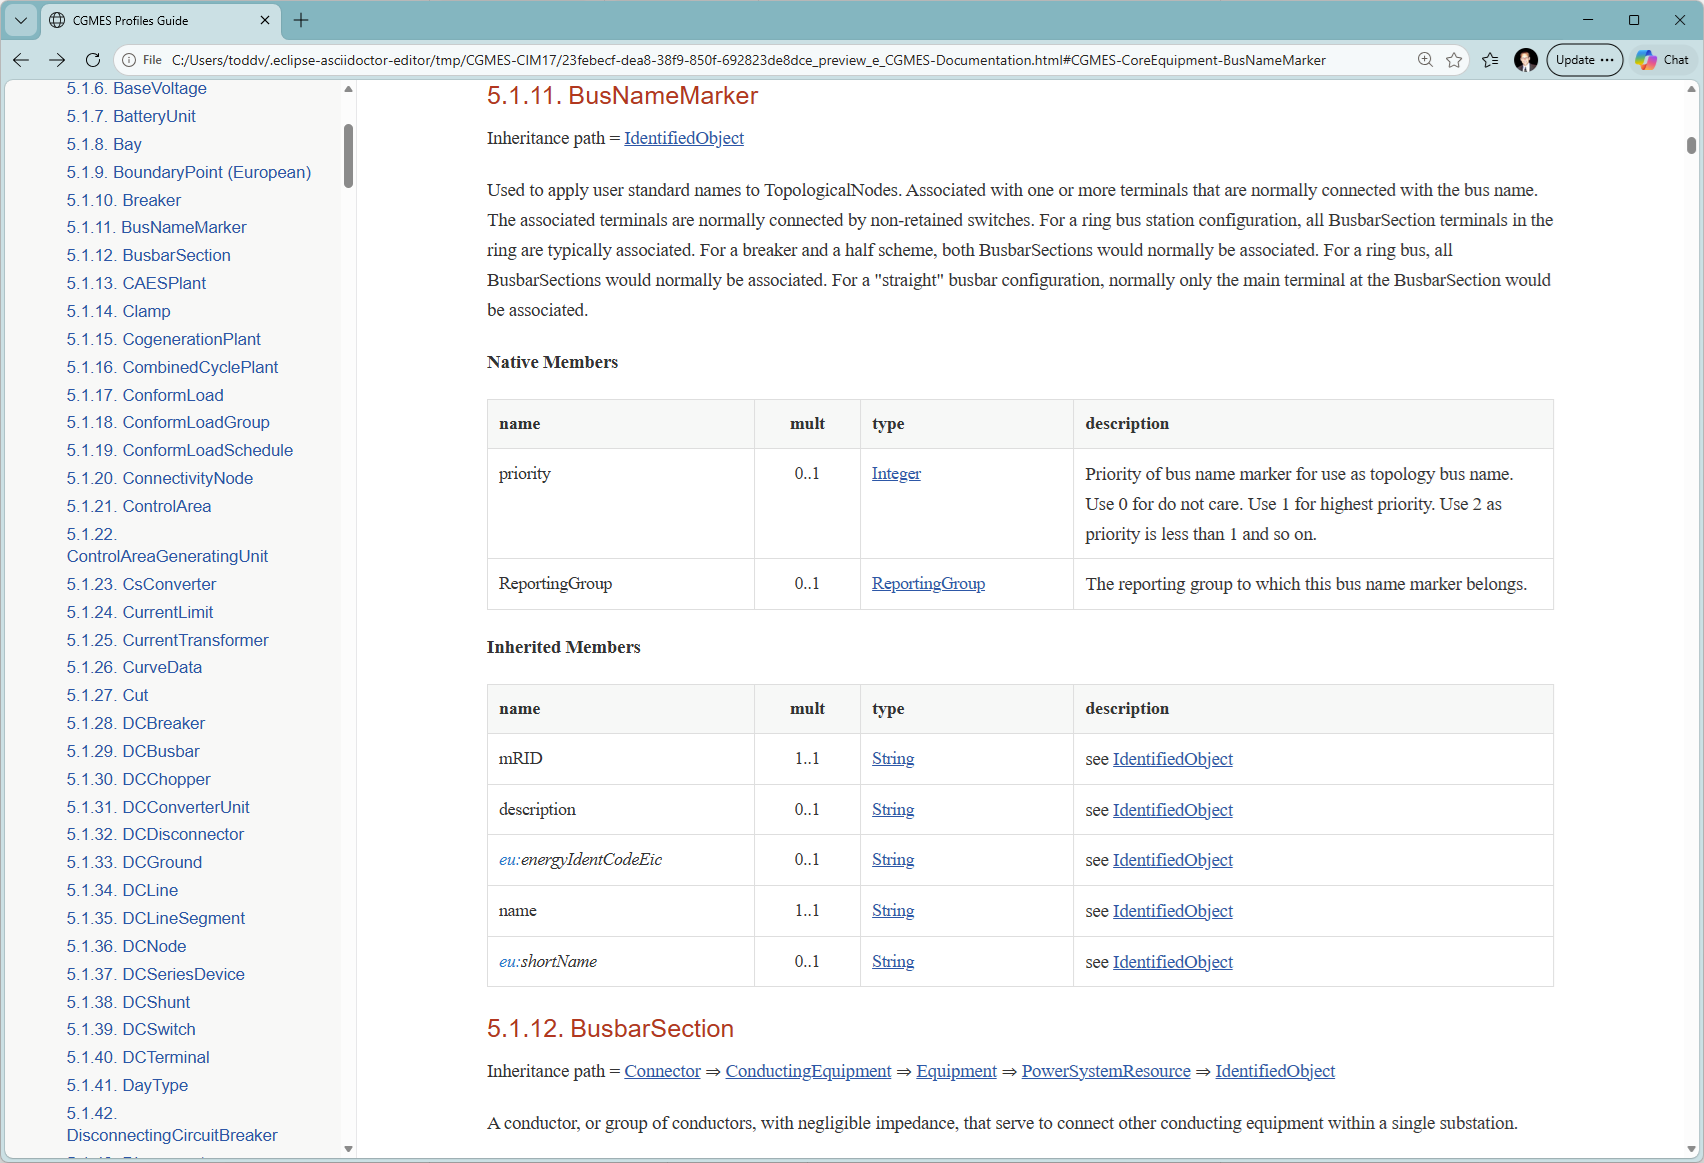
When a profile draws on attributes and associations from extension namespaces, such as the European (ENTSO-E) extensions to the CIM, the AsciiDoc builders can annotate those members in the generated documentation with a short namespace prefix, making it immediately clear which namespace each extension member belongs to. In the example below, the inherited members eu:energyIdentCodeEic and eu:shortName carry the eu: prefix, distinguishing them from the normative CIM members (mRID, description, name), which have none.
Click on the image to present a larger view.
These prefixes come from a namespace-prefixes mappings file, a distinct file from the stereotype-to-namespace .namespaces file described in CIMTool Support for Extension Namespaces. Where the .namespaces file maps stereotypes to namespaces during schema import, the .namespace-prefixes file maps each namespace to the prefix the builders should use when annotating members in that namespace.
The file follows the same naming and import conventions as the .namespaces file: it is named identically to the EA project file used as the project's schema but with a .namespace-prefixes extension, co-located with that schema file in the Schema folder, and automatically imported alongside the schema when a project is created or its schema is (re-)imported. Each line is a simple <prefix>=<namespace URI> mapping (lines beginning with # are comments):
nc=http://entsoe.eu/ns/nc#
eu=http://iec.ch/TC57/CIM100-European#
eumd=http://entsoe.eu/ns/Metadata-European#
With this mapping in effect, any member resolved to the http://iec.ch/TC57/CIM100-European# namespace is annotated with the eu: prefix in the generated documentation, as shown above.
Note
The .namespace-prefixes file is independent of the stereotype-to-namespace .namespaces file and does not require a .namespaces file to be present. It applies regardless of how the model's namespaces were defined, whether through a .namespaces file or through baseuri tagged values (see CIMTool Support for Extension Namespaces for both approaches). It is, however, honored only when the project's schema is an Enterprise Architect project file (.eap, .eapx, .qea, .qeax); it has no effect when the schema is imported in XMI format (.xmi or .owl).
Note
The .namespace-prefixes file is optional and is used only by the AsciiDoc builders to annotate generated documentation; it does not affect the profile definition itself. Both namespace prefixes and namespace URIs are case-sensitive (per the W3C Namespaces in XML specification) and are compared character by character (http://www.example.org/wine and http://www.Example.org/wine are distinct namespaces), so ensure each URI in the file exactly matches the namespace used in your model.
Building a Master Document
A master document is a top-level AsciiDoc file that assembles a complete, publishable document from smaller pieces: hand-written narrative, generated profile documentation, diagrams, and supporting assets. It lives at the root of the Documentation folder and uses AsciiDoc's include:: directive to pull in content from elsewhere in the project.
The publicly available CGMES-CIM17 sample project is a complete, worked example of this approach, and the rest of this section walks through how its master document, CGMES-Documentation.adoc, is put together. It is a recommended starting point for anyone looking to build their own modularized documentation.
The Document Header
The master document opens with a header that establishes document-wide settings and, importantly, defines a set of path attributes that the rest of the document uses to locate content:
:profilesdir: {docdir}/Profiles
:includedir: {docdir}/Documentation/Includes
:pdf-themesdir: {docdir}/Documentation/Themes
:pdf-theme: cgmes-adoc
:stylesdir: {docdir}/Documentation/Styles
:stylesheet: cgmes-adoc.css
:doctype: book
Two things are worth highlighting here. First, :doctype: book selects the AsciiDoc book document type, which supports the multi-chapter structure appropriate for a specification of this size. Second, the :stylesheet: and :pdf-theme: attributes point at the custom CSS and PDF theme in the Styles and Themes subfolders, applying the project's own look to HTML and PDF output respectively.
Note
Within a CIMTool project, the {docdir} attribute always resolves to the project root. The Asciidoctor editor runs with the project root as its base directory, so every path attribute above is written relative to that root ({docdir}/Profiles, {docdir}/Documentation/Includes, and so on) regardless of the fact that the master document itself lives in the Documentation folder. A leading ./ resolves from the same project root, so the ./Profiles/... paths you will see in CIMTool's generated artifacts and the {docdir}/Profiles/... paths you write in a master document point to the same place; {docdir}/ is simply the explicit, self-documenting form recommended when authoring. Writing your own master-document paths this way ensures they resolve correctly.
Assembling the Content
With the path attributes defined, the body of the master document is largely a sequence of include:: directives that interleave two kinds of content:
- Hand-written narrative from the Includes subfolder (introductions, overviews, and connecting prose) referenced via the
{includedir}attribute. - Generated profile documentation from the Profiles folder, the
.inline-rdfs.adocfragments produced by the AsciiDoc builders, referenced via the{profilesdir}attribute.
A simplified excerpt illustrates the pattern:
= CGMES Profiles Guide

include::{includedir}/introduction.adoc[]

include::{includedir}/cgmes-overview.adoc[]

include::{profilesdir}/CGMES-CoreEquipment.inline-rdfs.adoc[]

include::{profilesdir}/CGMES-Operation.inline-rdfs.adoc[]

include::{includedir}/conclusion.adoc[]
Because the included profile fragments are produced by inline builders they carry no document title of their own. However, they do generate their own section heading at the correct level, so they slot neatly beneath the master document's structure rather than competing with it. The narrative includes and the generated profile sections combine into a single, continuously document with appropriate page number automatically assigned across the document.
The Rendered Result
The master document can be rendered to HTML or PDF directly from the Asciidoctor editor using the toolbar actions described in The Asciidoctor Eclipse Editor. Both outputs apply the project's custom styling and include a generated table of contents with the assembled content.
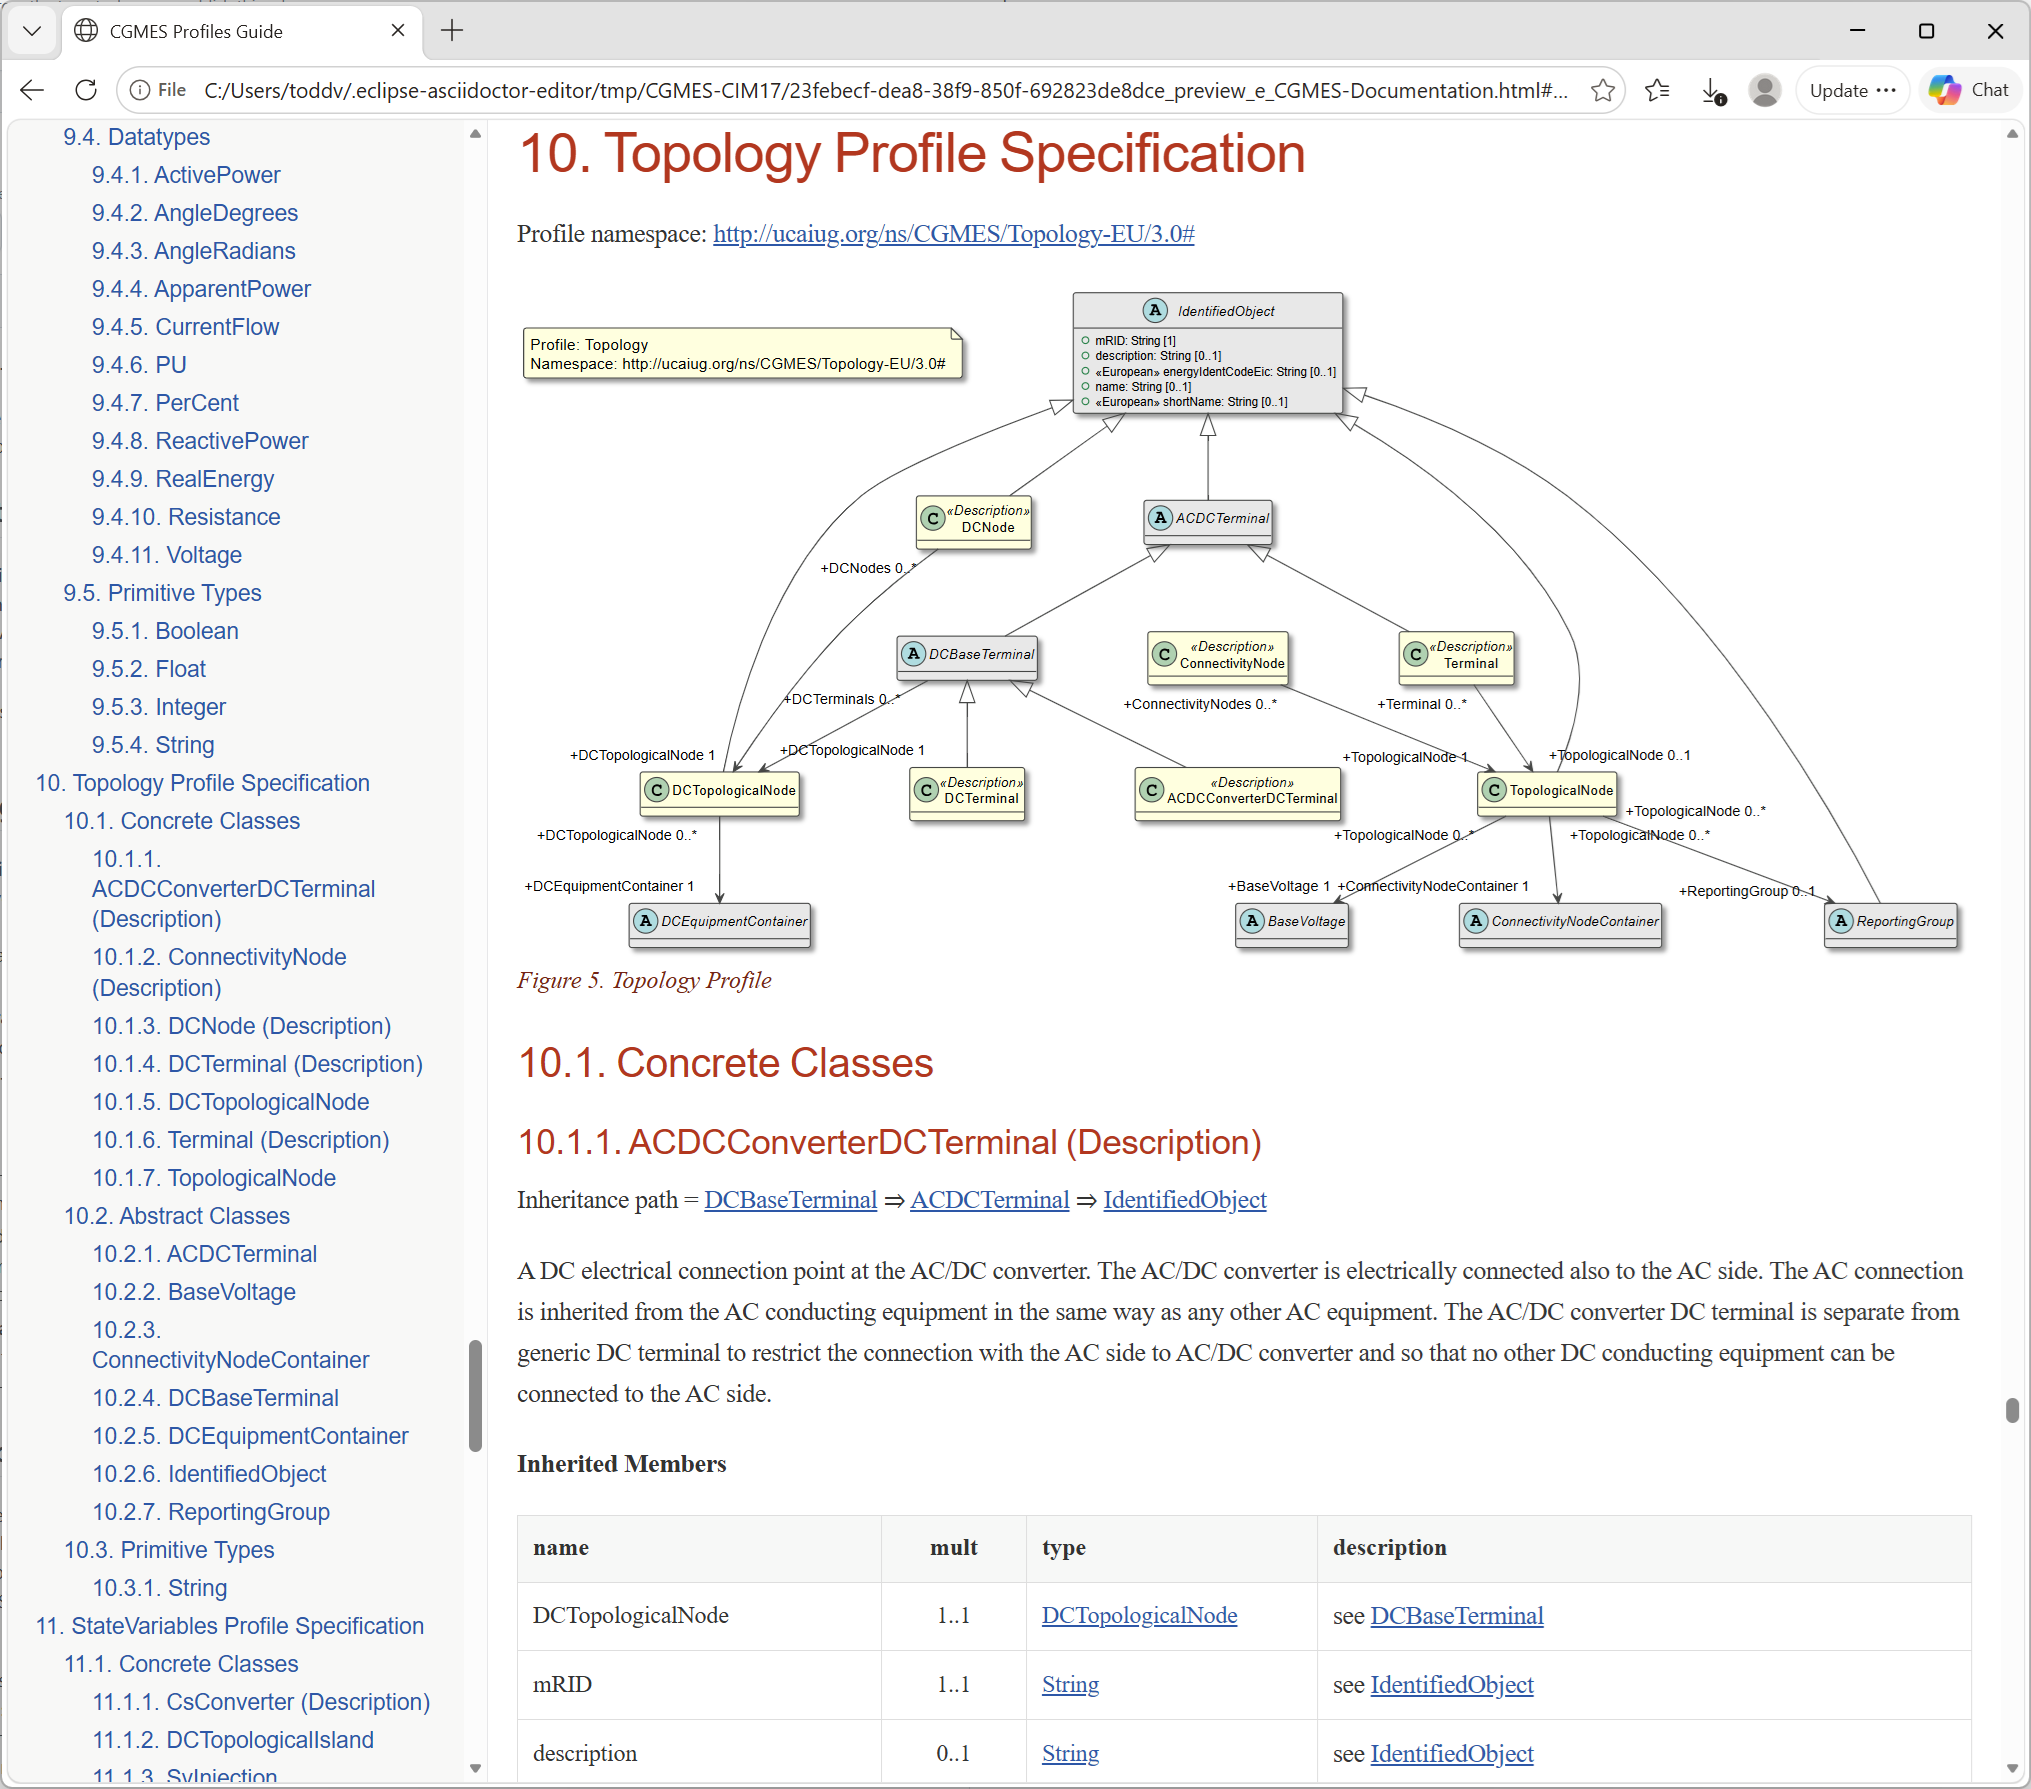
The HTML output, opened in an external browser, presents the assembled guide with a navigable table of contents, the generated profile sections, and the PlantUML class diagrams embedded from each profile:
Click on the image to present a larger view.
The same document rendered to PDF produces a paginated, book-style specification, in this case a multi-hundred-page guide assembled entirely from the project's narrative includes and generated profile documentation:
Click on the image to present a larger view.
AsciiDoc Syntax Quick Reference
This quick reference covers the AsciiDoc syntax you are most likely to use when authoring CIMTool documentation: in the "Description" and "Documentation" tabs, in Includes content, and in a master document. Each entry shows a brief example and links to the corresponding page in the official Asciidoctor documentation, where the full set of options is described. A few entries marked (CIMTool-specific) describe patterns particular to CIMTool projects and are documented more fully here, as they have no direct equivalent in the general AsciiDoc reference.
The examples below are a quick reference only. For the complete, authoritative AsciiDoc syntax documentation, see the AsciiDoc Syntax Quick Reference at the Asciidoctor documentation site, which this reference draws on.
Text Formatting
| Syntax | Description | Reference |
|---|---|---|
*bold* |
Bold text | → Docs |
_italic_ |
Italic text | → Docs |
`monospace` |
Monospace (code) text | → Docs |
*_bold italic_* |
Combined bold and italic | → Docs |
#highlight# |
Highlighted (marked) text | → Docs |
[.underline]#text# |
Underlined text | → Docs |
[.line-through]#text# |
Strikethrough text | → Docs |
^super^ |
Superscript | → Docs |
~sub~ |
Subscript | → Docs |
Paragraphs & Breaks
| Syntax | Description | Reference |
|---|---|---|
| (blank line between blocks) | Separates paragraphs | → Docs |
+ (at end of line) |
Hard line break within a paragraph | → Docs |
[%hardbreaks] |
Preserve all line breaks in a block | → Docs |
[.lead] |
Style a paragraph as a lead paragraph | → Docs |
''' |
Thematic break (horizontal rule) | → Docs |
<<< |
Page break | → Docs |
Section Headings
| Syntax | Description | Reference |
|---|---|---|
= Title |
Document title (level 0) | → Docs |
== Section |
Level 1 section heading | → Docs |
=== Section |
Level 2 section heading (add = per level, to level 5) |
→ Docs |
[discrete] |
Mark a heading as discrete (not part of the section hierarchy) | → Docs |
Document Header & Attributes
| Syntax | Description | Reference |
|---|---|---|
:name: value |
Define a document attribute | → Docs |
{name} |
Reference a defined attribute | → Docs |
:doctype: book |
Set the document type (article, book, etc.) |
→ Docs |
{docdir} |
Built-in attribute; in a CIMTool project resolves to the project root | → Docs |
Table of Contents
| Syntax | Description | Reference |
|---|---|---|
:toc: |
Enable the table of contents | → Docs |
:toc: left |
Position the TOC (e.g. in a left sidebar) | → Docs |
:toclevels: 3 |
Set how many heading levels the TOC includes | → Docs |
:toc-title: Contents |
Customize the TOC title | → Docs |
Lists
| Syntax | Description | Reference |
|---|---|---|
* item |
Unordered list item (**, *** for nesting) |
→ Docs |
. item |
Ordered list item (.., ... for nesting) |
→ Docs |
* [ ] item / * [*] item |
Checklist item, unchecked / checked | → Docs |
term:: description |
Description (definition) list | → Docs |
+ (on its own line) |
List continuation: attach another block to a list item | → Docs |
Links & Cross References
| Syntax | Description | Reference |
|---|---|---|
https://example.org |
Bare URL becomes an automatic link | → Docs |
https://example.org[Link text] |
URL with custom link text | → Docs |
link:path/to/file.html[Text] |
Link to a relative file | → Docs |
mailto:user@example.org[Text] |
Email link | → Docs |
[[anchor-id]] |
Define an inline anchor (reference target) | → Docs |
<<anchor-id,link text>> |
Cross reference to an anchor in the same document | → Docs |
xref:other.adoc#id[Text] |
Cross reference to another document | → Docs |
Images & Diagrams
| Syntax | Description | Reference |
|---|---|---|
image::file.png[Alt] |
Block image (on its own line) | → Docs |
image:file.png[Alt] |
Inline image (within a line of text) | → Docs |
image::file.png[Alt,300,200] |
Image with width and height | → Docs |
image::file.png[Alt,align=center] |
Image with alignment / positioning | → Docs |
The plantuml:: block macro embeds a PlantUML diagram, rendering a .puml file to an image as part of the document. CIMTool's generated profile documentation uses this macro to embed the PlantUML class diagrams produced by the PlantUML builders. It is provided by the Asciidoctor Diagram extension rather than core AsciiDoc, so it is documented here. You will most often see it in generated Profiles/ artifacts, where the builder writes the path relative to the project root:
.ShortCircuit Profile
plantuml::./Profiles/CGMES-ShortCircuit.rdfs-t2b.puml[format=svg, align=center]
The line beginning with a dot (.ShortCircuit Profile) is the optional diagram title. The macro target is the .puml file to render (resolved from the project root, the same base used everywhere in a CIMTool project), and the bracketed attributes control the output: format=svg renders to SVG (sharp at any zoom), and align=center centers the diagram.
Include Directives
| Syntax | Description | Reference |
|---|---|---|
include::file.adoc[] |
Include the contents of another AsciiDoc file | → Docs |
include::file.adoc[lines=5..10] |
Include only specific lines | → Docs |
include::file.adoc[tag=name] |
Include only a tagged region | → Docs |
include::file.adoc[leveloffset=+1] |
Shift the included content's heading levels | → Docs |
In a CIMTool master document, content you author yourself, include:: directives are written project-root-relative using the {docdir} attribute (or path attributes derived from it, such as {includedir} and {profilesdir}). This is how a master document pulls in both hand-written narrative and generated profile documentation:
include::{docdir}/Documentation/Includes/introduction.adoc[]

include::{docdir}/Profiles/CGMES-CoreEquipment.inline-rdfs.adoc[]
The first line includes a hand-written narrative file from the Includes subfolder; the second includes a generated .inline-rdfs.adoc profile fragment from the Profiles folder. See Building a Master Document for the full pattern.
Admonitions
| Syntax | Description | Reference |
|---|---|---|
NOTE: text |
Single-paragraph admonition (also TIP, IMPORTANT, WARNING, CAUTION) |
→ Docs |
[NOTE] + ==== block |
Multi-paragraph admonition block | → Docs |
Source Code & Literal Blocks
| Syntax | Description | Reference |
|---|---|---|
`+literal+` |
Inline literal monospace (no substitutions) | → Docs |
.... block |
Literal block: text shown verbatim | → Docs |
---- block |
Listing block: preformatted code or output | → Docs |
[source,xml] + ---- block |
Source block with language for syntax highlighting | → Docs |
<1> (in code) + <1> note |
Callouts annotating lines of a code block | → Docs |
Tables
| Syntax | Description | Reference |
|---|---|---|
\|=== ... \|=== |
Table delimiters enclosing the table | → Docs |
\|cell |
A table cell (one per line, or several on a line) | → Docs |
[%header] |
Promote the first row to a header row | → Docs |
[cols="1,1,2"] |
Define columns and their relative widths | → Docs |
[cols="1,1a"] |
The a modifier makes a column render AsciiDoc content |
→ Docs |
.Title (above table) |
Give the table a caption/title | → Docs |
Sidebars, Examples & Blockquotes
| Syntax | Description | Reference |
|---|---|---|
**** block |
Sidebar: set-apart auxiliary content | → Docs |
==== block |
Example block | → Docs |
____ block |
Blockquote | → Docs |
-- block |
Open block: a general-purpose container | → Docs |
Comments
| Syntax | Description | Reference |
|---|---|---|
// comment |
Single-line comment (not rendered) | → Docs |
//// block |
Block comment (not rendered) | → Docs |
PDF & HTML Styling Attributes
These attributes, set in a master document's header, control the appearance of generated output. In a CIMTool project they typically point at the Styles and Themes subfolders of the Documentation folder.
| Syntax | Description | Reference |
|---|---|---|
:stylesdir: |
Directory containing CSS stylesheets (HTML output) | → Docs |
:stylesheet: |
The CSS stylesheet to apply to HTML output | → Docs |
:pdf-themesdir: |
Directory containing PDF theme files (PDF output) | → Docs |
:pdf-theme: |
The PDF theme to apply to PDF output | → Docs |
[.rolename]#text# |
Apply a custom role (styled by the stylesheet or theme) | → Docs |
Text Replacements & Escaping
| Syntax | Description | Reference |
|---|---|---|
(C) (R) (TM) |
Replaced with ©, ®, ™ | → Docs |
-- |
Replaced with an em dash (—) | → Docs |
-> => <- <= |
Replaced with arrows (→, ⇒, ←, ⇐) | → Docs |
\ (before markup) |
Backslash escapes the character that follows | → Docs |
+text+ |
Inline passthrough: render text without substitutions | → Docs |
&#NNN; |
Named, decimal, or hexadecimal character reference | → Docs |